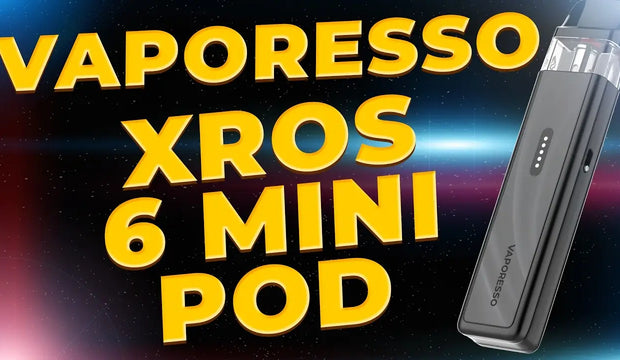
Vaporesso XROS 6 Review
The XROS 6 is an evolution of Vaporesso's XROS line with an emphasis on battery life, a revised airflow system and an updated user interface. It keeps the pod format familiar to experienced vapers while introducing a few new hardware and software touches intended to simplify setup and improve day to day use.

XROS 6 - What you get in the box
- Device
- Two pods, one preinstalled and one spare, shown as a 0.6 ohm and 0.8 ohm variant in the sample
- USB Type-C cable
- Manual and fill guide

Vaporesso XROS 6 Pod Vape Kit
The Vaporesso XROS 6 Pod Kit is an upgraded refillable pod kit with a larger 1800mAh battery, USB-C 3A charging, colour screen, Venturi airflow system and support for the latest XROS pod platform.
Best for
- Longer daily battery life
- Simple pod vaping
- XROS users upgrading

XROS 6 Design and build
Size, weight and layout
The XROS 6 is broadly similar in footprint to the XROS 5 but feels noticeably heavier. That extra weight is down to a larger internal battery. The device uses a top-mounted magnetic pod, a front screen with selectable themes and a single fire/power button. A vent hole appears on the base for battery venting.
Materials and finish
The unit ships with protective films and a tinted coloured screen. Pods are larger than some earlier XROS pods, and they sit on strong magnets for a positive connection.

Screen, menu and controls
The XROS 6 has a colour display with multiple themes. Navigation is simple: five clicks of the fire button turns the device on. The main menu includes theme selection, power modes and a prime coil setting. There is also a quick draw option which can be enabled or disabled in the settings.
Power mode behaviour is restricted by coil selection. The device does not allow manual wattage adjustment unless a 0.4 ohm coil is fitted. For most coil options, the device manages output automatically via its internal circuitry.
Locking and unlocking is achieved with quick presses of the fire button. The device uses a multi-click pattern for power and lock functions.

Pods, coils and filling
Pods for the XROS 6 use Vaporesso's latest pod design. The sample included a 0.6 ohm pod preinstalled and a spare 0.8 ohm pod. Vaporesso also uses the CORE X3 coil family in this line.
Filling is straightforward. The pod top snaps off, exposing a fill port with a coloured insert. Insert your bottle tip into the red fill port and squeeze until the pod is full. The device detects pod insertion automatically.
Note on pod capacities: retail pods may be offered in different capacities. The sample used had a larger pod, but retail availability varies.

XROS 6 Prime coil feature
One notable software addition is a prime coil function in the menu. According to the on-device instructions, activate prime, wait 60 seconds and press the button for three seconds to stop priming. The function appears to run a timed cycle aimed at preparing the coil and wick before first use. The manual provides the same brief instruction and does not detail the internal process, so the feature should be treated as a timed priming aid rather than a guaranteed method to prevent dry hits.
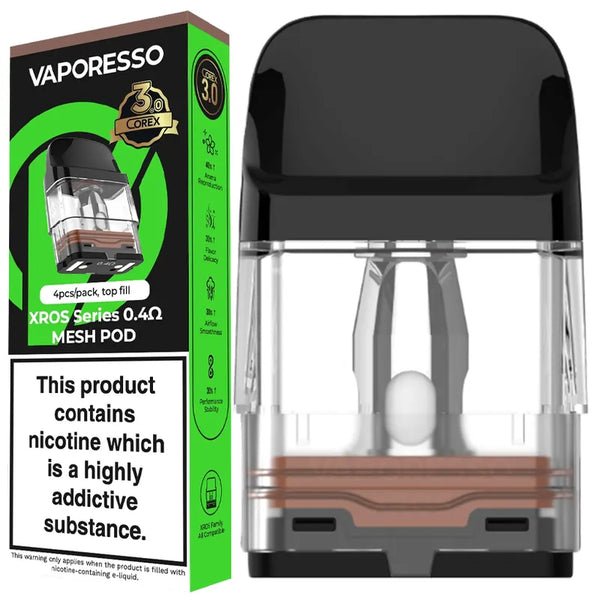
Vaporesso XROS Replacement Pods
Vaporesso XROS COREX 3 pods are built for the newer XROS pod platform, offering improved flavour consistency, smoother performance and simple built-in coil replacement.
Best for
- XROS 6 users
- Better flavour consistency
- Easy pod changes

Airflow and performance
Vaporesso describes a new Venturi airflow system on this model. The change is intended to produce a smoother airflow compared with prior XROS pods. In practice the pod offers a comfortable draw and a vape character consistent with subohm pod devices. Coils in the CORE X3 family are used to deliver the expected performance profile.
Note that wattage control is limited to certain coil choices. If you prefer manual wattage adjustment you will need a coil that the device recognises for that mode.

Battery and charging
The XROS 6 uses a significantly larger battery than the previous generation. Sample units are fitted with an 1800 mAh cell, up from 1500 mAh on the XROS 5. That increase makes the device feel heavier but extends run time substantially.
Charging is by USB Type-C and supports up to 3 amp charging. Use a compatible cable and rated charger to take advantage of the faster input.
XROS 6 Setup quick steps
- Remove protective films and insert pod until it clicks.
- Fill the pod via the red fill port. Refit the pod top and allow a moment for liquid to settle.
- Power on with five clicks of the fire button.
- Optional: use the prime coil function in the menu, wait the 60 second cycle and cancel if required.
- Adjust themes or enable quick draw in settings if desired.
Pros and cons
Pros
Substantially larger battery than the previous generation
USB Type-C with 3 amp charge support
New Venturi airflow for a smoother draw
Easy magnetic pods and simple fill method
Colour screen with themes and basic menu options
Cons
Heavier than earlier XROS models due to the larger battery
Limited manual wattage control unless using a 0.4 ohm coil
Prime coil feature is a black box function with only a timed instruction in the manual
Pod capacity and exact retail pod variants may vary
Final thoughts on the XROS 6
The XROS 6 is a pragmatic update that focuses on battery life and user convenience. It keeps the familiar pod workflow while adding a few modern touches: faster charging, a smoother airflow approach and a dedicated prime function. For vapers who prioritise longer run time and a simple setup, the XROS 6 is worth considering. For those who want granular wattage control without swapping coils, confirm coil compatibility before committing.